Importing records into WorkExpo is a two step process. First export the records from your school's central database then import the records into WorkExpo. Follow these instructions.
|
What to do |
Notes |
|
1. Export the student records from CASES/CASES21 or any other school computer system as a comma delimited (separated) text file. |
All school database systems are able to export data as text files. |
|
2. It’s important that the fields WorkExpo needs are exported. See the required list to the right: |
|
|
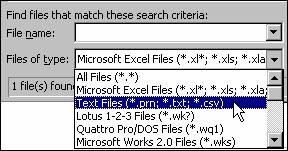
3. Name the exported text file and save it to memory stick or a shared network location |
Exported file can be named anything but should have a .txt (TEXT) file extension.
|
|
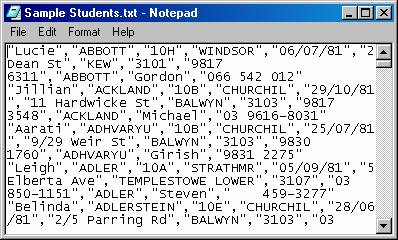
4. Text file can be opened using Windows Notepad and should look similar to this. |
|
|
5. Start Microsoft Excel |
|
|
6. Open the file WorkExpo.xls |
This file contains macros to help you set up the text file for import into WorkExpo. If Excel asks you to open with macros you should say YES. |
|
7. Next, open the TEXT file you saved earlier. |
|
|
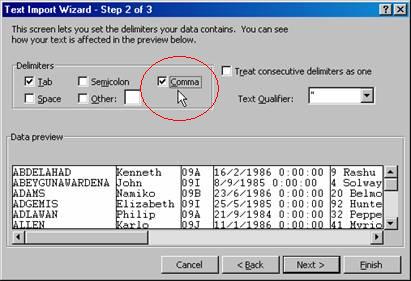
8. Excel will automatically start the TEXT IMPORT WIZARD. |
|
|
9. In STEP 2 of the wizard make sure under Delimiters you have selected COMMA |
|
|
10. Make sure that the columns in WorkExpo are in the correct order.
Note that these fields are the MINIMUM fields required for import. |
COLUMN ORDER (Include all columns)
|
|
11. Use the WorkExpo toolbar to help you set up the spreadsheet. Although some setting up needs to be done manually. |
Note: This file is available for download from our website. |
|
12. Use the ARROWS to move Excel columns to the left or right. |
|
|
|
|
|
13. The PARENT NAME needs to be in single column but the spreadsheet may contain two columns i.e. parent’ first name and parent last name. |
|
|
6. When all is ready click the SETUP icon on the WorkExpo toolbar to finish the job. |
Clicking this button will add column headers, change text case to proper case and format the spreadsheet correctly, ready for import.
|
|
7. Finally the spreadsheet is now ready to be saved. It must be saved as an Excel file. i.e. it must have an .xls file extension.
|
|
|
8. Close Excel and start WorkExpo. Start the WorkExpo import wizard again and import the newly saved Excel spreadsheet. |
|

 Select the column to move by placing the cursor in the selected column, then click move left or right on the toolbar

 |
To view an audio visual demonstration how to import records: In WorkExpo choose Help / Video Tutorials / Importing student data. |